安装使用本产品之前,敬请仔细阅读本手册,确保完全理解本规格书以避免不必要的损坏和额外的费用。
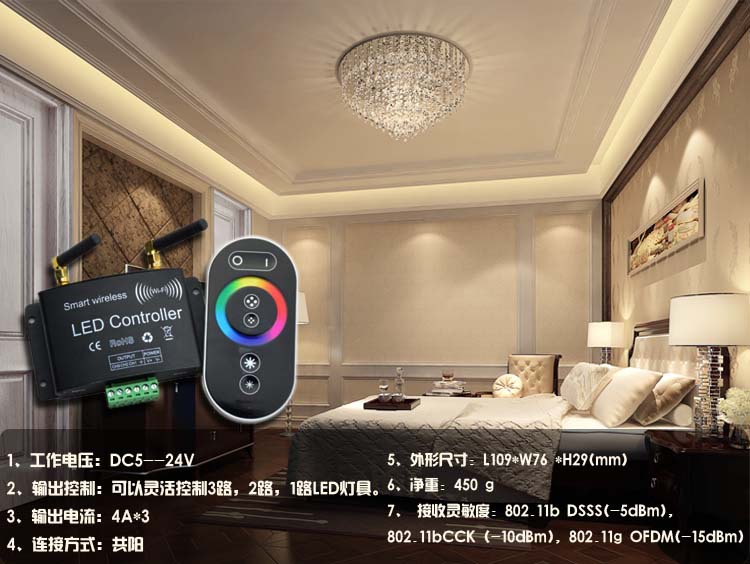
产品简介
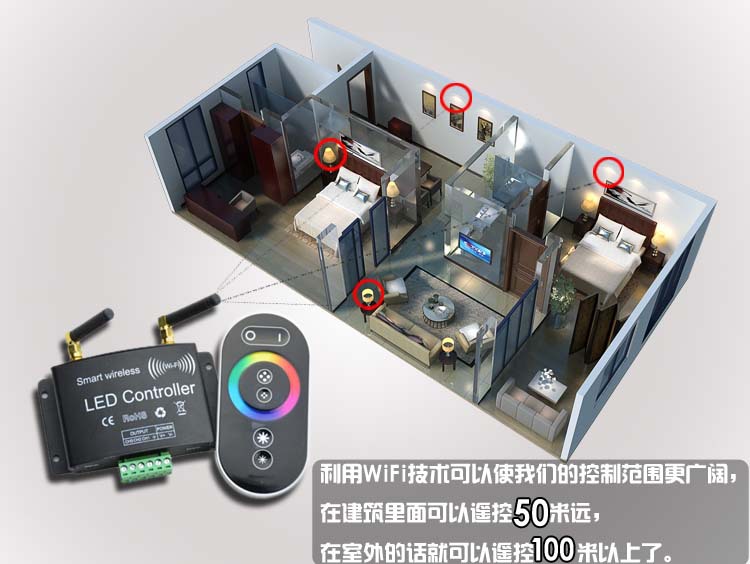
WIFI-MINI LED控制器是继传统带有无线的LED控制器基础之上,与市场上最新的WIFI技术集成的智能化无线控制器。结合WIFI技术的应用使得LED控制更加先进、智能和便捷,通过装有安卓系统或者苹果系统的智能手机或者平板电脑,安装相应控制软件便可以控制LED灯具的变化效果。WIFI控制器集RGB、调色温、调光三大功能,用户只需在操作软件上切换界面即可实现相应的控制;适用于控制各种恒压LED灯具,例如:RGB LED灯条、LED模组、LED灯串等;并可以与本公司的信号放大器进行功率扩展,实现更多LED灯的同步变化,理论上可以连接无数个放大器。
技术参数
一、控制器技术参数:
工作温度 | -20-60℃ | 供电电压 | DC12~24V |
静态功耗 | <3W | 连接方式 | 共阳 |
WIFI亮度档 | 100级 | WIFI速度档 | 100级 |
净重 | 65G | 毛重 | 85G |
外型尺寸 | 84mm*45mm*22mm | 包装尺寸 | 97MM*83MM*30MM |
输出 | 3回路 | 输出电流 | ≤4A(每回路) |
WIFI接收频率 | 2.4G | 输出灰度等级 | 256级 |
接收灵敏度 | 802.11b:DSSS(-5dBm) 802.11b:CCK(-10dBm) 802.11g:OFDM(-15dBm) |
输出功率 | 12V:≤144W 24V:≤288W |
二、软件技术参数:
名称 | FreeColor V1.0 | 运行平台 | Android/IOS 设备必须带有WiFi功能 |
大小 | Android(661KB) IOS(1.4MB) | 语言 | 英文 |
类别 | 通讯 | | |
产品特点
1、 本产品为恒压型控制器,标准产品供电电压12-24V为宽压,在这范围的电源可通用;
2、 输出为三回路,每路允许最大电流为4A,能带12V30灯/米的灯带20米,12V60灯/米的灯带10米;
3、 支持安卓或苹果移动设备WIFI控制,同时也支持无线射频触摸遥控器控制,更加灵活,高效,智能。
4、 RGB模式、调色温、调光三合一安卓或苹果移动设备应用软件,一机多能,应用不同灯光场合。
5、 具有断电记忆存储功能,每次上电都会保留上次掉电时的变化模式;
使用说明
一、FreeColor V1.0软件安装以及SSID设置说明
1、该软件分Android 版本和IOS版本,根据你的手机系统来选择安装适合的版本。
下面分别介绍安卓版本和ios版本的安装和使用方法:
Android 版本安装如下:打开光盘,点击安装FreeColor软件,直至安装完成。
ISO版本安装如下:进入app store搜索FreeColor软件,找到该软件后点击安装就可以。
2、设置SSID号(附近如有多台WIFI控制器,为避免相互干拢,可将SSID号更改为其他,最多为16个)
本产品出厂默认SSID号为HX001,如需更改SSID号,实现每一台独立控制,可以用带有WIFI功能的手机进行更改设置,SSID号范围为HX001-HX016。下面将介绍如何进入页面进行设置:
①将WIFI-LED控制器正确接好灯具,然后上电;
②打开手机浏览器,输入192.168.2.2,弹出进入界面,如图
初始默认用户名Username:admin;初始默认密码password:admin点击OK进入界面。
3如需更改登录用户名与密码,可通过以下界面进行更改:
新的用户名与密码设置好之后,点击Apply进行提交。
4.如需更改SSID号,可通过以下界面进行更改:
重设好之后点击Apply提交。
5.如需设置连接密码,可通过以下界面进行更改:
二、FreeColor V1.0软件使用说明
1、WIFI-LED控制器正确接好灯具,然后上电;
2、在手机上查找WIFI网络名为“HX---”(如HX001或HX002),并连接该网络;
3、然后打开FreeColor V1.0控制软件,进入控制界面,如果打开FreeColor V1.0控制软件时未连接WIFI网络或者需要更换SSID,也可以进入右下角“软件设置窗口”,点击“WIFI Connectiom Setting”进行连接网络;
4、网络设置好后,进入软件的控制界面,分别可以选择RGB或CT或DIM三种界面,如图所示:
七彩/RGB应用界面 色温/CT应用界面 调光/DIM应用界面
点进右下角的“软件设置窗口”,选择相应控制界面类型,如下图所示:
5、以RGB为例:(另外两种控制界面上的功能相同)
1)、RGB控制界面
序号 | 按键名称 | 功能介绍 |
1 | DIY存储键 | 自定义保存你喜欢的变化效果 |
2 | 开关键 | 可对控制器进行开启或关闭 |
3 | 颜色显示栏 | 显示RGB三种颜色的数值和L亮度百分比 |
4 | RGB色盘 | 触摸相应颜色灯具也亮相应颜色的灯光 |
5 | 亮度调节滑条 | 可对灯光的亮度进行调节,一共100级 |
6 | 软件设置界面窗口 | 进入可以对RGB、CT、DIM界面进行切换以及WIF连接设置 |
7 | DIY读起界面窗口 | 进入可读起DIY存储键保存的变化效果 |
8 | 动态模式界面窗口 | 进入可选择跳变、渐变等多种不同的变化效果 |
9 | RGB色盘控制界面窗口 | 进入RGB七彩色盘 |
2)动态模式控制界面:
(1)、MODE(模式):动态变化模式选择;
(2)、SPEED(速度):速度调节,1-100共100个等级;
(3)、 EFFECT(效果):颜色效果选择,每种动态变化可以选择不同的颜色效果;
3)、DIY存储与读起界面:
4*3存储区:如果需要保存自己喜欢的变化效果,可以点击左上角的“DIY存储键”进行保存并命名,
以后如需使用存储的变化效果,只要点击界面最下面的“DIY读起健”选择所命名的模式;
4)、软件设置界面:
(1)System Settings(系统设置):wifi connection Setting(wifi连接设置);
(2)Product Attribures Settings(产品属性设置): Type Setting(类型设置);Type Setting有三种类型选择
三、控制器使用说明
1、接口说明
RESET键:拆开外壳,里面有一个按键,长按此键5秒,WIFI之前所设置的数据将被清除,返回出厂默认。
3、控制器接线方式
(1)RGB七彩接线方式:连接CH3→B、CH2→G、CH1→R、V+→COM;
(2)CT双色温接线方式:连接G→WW、R→WC、V+→COM;
(3)DIM单色接线方式:连接R→V-、G→V-、B→V-、V+→V+;
注意事项
1、 本标准产品供电电压DC12V~24V,不得接到其他电压上;
2、 上电前确保接线正确无短路,如果灯出现不工作,应及时断电,防止短路把控制器烧坏,
并检查线路是否有问题;
3、LED灯的公共极、R、G、B的出线应与产品的输出排序+RGB对应连接;
4、灯条等恒压灯具不能串接太长,因为灯具本身有压降,会导致后面的灯的亮度下降和信号减弱,
这时需要与RGB信号放大器进行扩展串接更多数量的LED灯具;
5、本产品不可超负荷使用,LED灯具的总功率不能超过产品所能承受的最大功率;
6、本产品的质保期为1年,但不包括人为损坏、购买后运输中的损坏以及自然力造成的损坏等各种外部因素造成的情形。
常见问题
问题 | 可能原因 | 解决方法 |
1、 上电后灯具不亮 | 电源线未接好或者开关电源无输出 | 接好电源线或更换电源 |
灯具电源线未接好或短路 | 接好电源线 |
2、连接某些负载后控制器不工作 | 所接的负荷过大,烧坏了控制器里的某些元器件 | 更换元器件或更换控制器 |
3、FreeColor软件打不开 | 可能是手机WIFI没有连接到控制器 | 如果碰到这种情况,需要检查手机WIFI是否与控制器连接上,如果没连接上,请连接上并重新打开就能解除这个问题,如果还不行,那可能是软件对这款手机兼容性不是很好,那么软件可能需要安装到其它手机上去使用了 |
4、FreeColor软件遥控不了LED灯 | WIFI网络不稳定或者已掉线 | 1.可以试着使你的手机遥控器和控制器距离缩短一些。2.重新连接 |
Before installing this product,Please read this manual carefully. Ensure full understanding of this specification to avoid unnecessary damage and additional costs.
This product warranty is 1 years(exclude the artificial situation of damaged or overload working)
Product Description
WIFI-MINI controller appeared with the installation of controlling software on mobile devices with Android or IOS system, such as android phone, iPhone, tablet PCs, they can remote control LED lighting products through WiFi, which makes LED control more intelligent and humanization. One WIFI-MINI controller can be used as dimmer, CT controller, and RGB controller, only need to select the right control interface in the software. In addition, this model has DIY function. Users can get any effect they want based on our controlling software. This model designed for constant voltage led products, such as led strip, led modules. For controlling more led products, amplifier is available.
Technical parameters
1. Controller
Working temperature | -20-60℃ | Working voltage | DC12~24V |
Power consumption | <3W | Connect method | Common anode |
WIFI brightness level | 100 | WIFI speed level | 100 |
N.W. | 65g | G.W. | 86g |
Case dimension | 84mm*45mm*22mm | Box dimension | 97MM*83MM*30MM |
Output | 3 channels | Output current | ≤4A(each channel) |
WIFI frequency | 2.4G | Output gray scale | 256 |
Receiving sensitivity | 802.11b:DSSS(-5dBm) 802.11b:CCK(-10dBm) 802.11g:OFDM(-15dBm) |
Output power | 12V: ≤144W 24V: ≤288W |
2. Software
Name | FreeColor V1.0 | Platform | Android 2.1 or above, IOS4.3 or above, with the wifi function |
Size | Android(661KB) , IOS(1.4MB) |
Category | Communication | Language | English |
Download | IOS: App Store-FreeColor; Android: Google Play-FreeColor |
Features
- 1. Support both wifi control of Apple products (iPod, iPad, iPhone), Android mobile devices like Samsung, HTC.
- 2. With the 3-in-1(Dimming, CT, RGB) apple/android software. One device suit to different lighting application scene.
- 3. Memory function to save scenes anytime anywhere for next play.
- 4. WIFI-MINI is designed for constant voltage led products, working voltage auto fit to DC12-24V.
- 5. Wifi control based on 2.4GHZ frequency.
Using illustration
1. FreeColor V1.0 software installation and SSID (system settings ID) reset.
1.1 Software installation
l Android: the software copy in CD which packed in the box. Open the CD and double-click the “Freecolor.apk”to start the installation.
l IOS: the same as the other software from App Store download the “Freecolor” from App store and install.
1.2 Resetting SSID
If more than one WIFI-V01 in close area, we can reset the SSID for the devices in order to avoid they jamming each other. The SSID are 16 in max.
The default SSID number for all devices is HX001, a device with WIFI function will be needed when resetting the SSID. The SSID rang is: HX000-HX016. The steps are as follow:
① Making the WIFI-V01 properly connected, and then open the power;
② Opening the WIFI device browser, type in “192.168.2.2”, the interface will pop into as below:
The initial default Username: admin, password: admin. And “OK”.
③ Resetting the SSID in the page as below:
④ If necessary, setting the linking password for more security.
A. Select the “Security Mode”: WPA2-PSK.
After setting, click “Apply” to finish.
⑤ If necessary, setting new “Username” and password in the page as below:
After setting, click “Apply” to finish.
2. FreeColor V1.0 software operating illustration
1) Making the WIFI-V01 and LED products in correct connection, and then turn on the power supply;
2) After step 1), open the WIFI setting interface on the device with WIFI function will find the WIFI which named “HX---”, connect it.
3) Open the “FreeColor” and start operation. There also have “WIFI Connection Setting” page in the software.
4) “FreeColor” is 3-in-1 (Dimmer, CT, RGB) software, the RGB scene is the default application interface. Enter the “System Setting” page to change the selection. The interface as below:
Click go to “System Settings” page as below, and click “OK” to finish the “Type Setting”:
RGB Interface CT Interface Dimming Interface
5) Using RGB interface as example(Dimming and CT are same)
① RGB control interface:
No. | Button | Function |
1 | DIY mode saving key | After DIY, click this key to save. Saving the DIY mode in anytime |
2 | ON/OFF | Turn on/off WIFI-V01 |
3 | Color value | Display the R/G/B gray value, “L”: the current brightness level. |
4 | Color board | Select any static color mode from the board. |
5 | Brightness slip | Slip to adjust the current light brightness, 100 levels in total. |
6 | System setting | Click to system setting page, set the WIFI connection and select the application scene (Dimming, CT, RGB). |
7 | DIY memory function | Go to DIY modes select page. Display all of the DIY modes. |
8 | Dynamic modes | Go to select the dynamic modes. |
9 | Current application show | Display the current application scene. |
② Dynamic modes control interface:
² MODE:select the different dynamic mode, such as flash, fade and etc;
² SPEED:select the speed level of the dynamic mode,100 levels in total;
² EFFECT:select the different effect based on the different mode.
③ DIY modes manage interface:
This page displays all of the DIY modes which have been saved, up to 12 modes in total.
④ System Setting interface:
² System Settings:wifi connection Setting;
² Product Attributes Settings:Type Setting (RGB/CT/DIM).
3. Controller operation illustration
1)、Connector illustration
RESET key:Open the shell, there is a button,press and hold at least 5 seconds, WIFI previously set data will be cleared to return to the factory default.
2) Controller connection
① RGB connection: CH3→B、CH2→G、CH1→R、V+→COM;
② CT connection: G→WW、R→WC、V+→COM;
③ Dimming connection: R→V-、G→V-、B→V-、V+→V+;
Notes
1. Supply voltage of this product is DC12V~24V, never connect to others or AC220V.
2. Lead wire should be connected correctly according to grade that connecting diagram offers. Miswires may destroy the controller and LED products.
3. Overloading may destroy the controller;
4. Warranty of this product is one year, but exclude the artificial situation of damaged or overload working.
Common Problems
Problems | Possible cause | Solution |
- 1. Lamp does not light after power
| Power cord is not properly connected, or there is not output switching power supply | Connect the power cord properly or replay the power |
Lamp power cord is not connected or short circuit | Connected lighting power cord |
2. The controller does not work after connecting the load. | The connected load is too large,so that it has burned in some of the components of the controller | Replace parts of components or replace the controller |
3. FreeColor is unavailable | The connection between controller and WIFI device may unnormal. | Check the connection and try again. And make sure the compatibility between the software and the WIFI device. |
4. WIFI device can not remote control the controller | WIFI is not stable or off line | Reconnection or short down the distance between controller and the WIFI device. |


 中国互联网
中国互联网 深圳网络警
深圳网络警 公共信息安
公共信息安 不良信息
不良信息 中国文明
中国文明